Creating Client
Creating a Client is necessary to add the new people who have joined as customers of the organization.
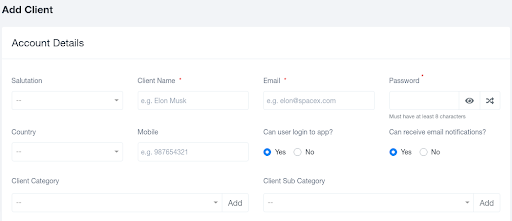
A client can be created by clicking on the "Add Client" option in the top left corner of the Clients module. Clicking on it will take you to a pre-generated form, once the details are added to it a new client is created.
The form asks for the following details:
- Salutation: It allows for the selection of the addressing salutation for individuals from Mr./ Mrs./ Ms.
- Client Name: It takes the input of the name of the newly created member.
- Email: It requires email details for all sorts of communication.
- Password: This allows individuals to access their accounts.
- Country: This section tells where the individual belongs.
- Mobile: It requires an individual's mobile number for communication.
- Can the User Log in to the App?: Selecting Yes or No to this question allows the user to access the information in the application.
- Can the user receive Email Notifications?: Selecting Yes or No to this question will decide whether the user will receive the notifications on their email or not.
- CLIENT CATEGORY: The client category permits you to classify a specific client into the generally accepted genres by the company which is used for filtering the recorded list later while viewing.
- CLIENT SUB-CATEGORY: The client sub-category allows further subdivision of the genre defined for the client so that proper segregation is done whenever required.
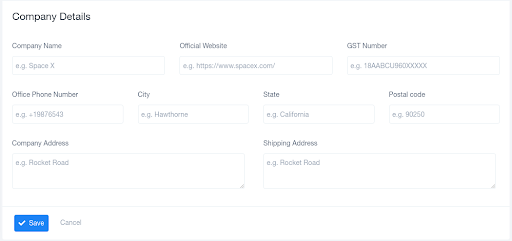
- COMPANY NAME: For instance, when the client belongs to an organization or a company these details are required. So, this section records the data of the organization the work being done for.
- OFFICIAL WEBSITE: Records the link for the official website of the organization in case a brief overview is ever needed.
- GST NUMBER: GST Number is required for any sort of payment procedure. Thus, to avoid future inconvenience, this detail is recorded beforehand.
- OFFICE PHONE NUMBER: Phone numbers are collected in the database for communication purposes.
- CITY: It records the location (city) where the organization is based.
- STATE: It records the location (state) where the organization is based.
- POSTAL CODE: It records the detailed location by recording the postal code for the organization.
- COMPANY ADDRESS: This is to collect the complete address of the company for any future reasons where it might be of some use to the recording organization.
- SHIPPING ADDRESS: This collects the address so that any kind of delivery for documents or products can be done.
Adding Leads
Adding new leads and adding their information to the already created list is necessary to update the database with the changing information of the organization.
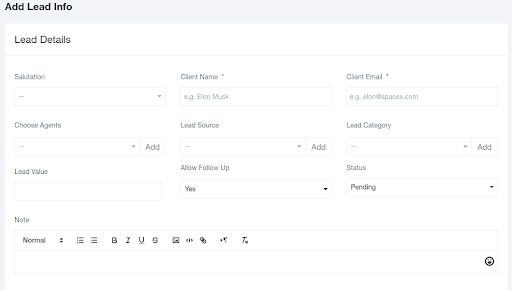
A lead can be created by clicking on the "Add Lead" option in the top left corner of the Leads module. Clicking on it will take you to a pre-generated form, once the details are added to it a new lead is created.
The form asks for the following details:
- SALUTATION: It allows for a selection of the addressing salutation for individuals from Mr./ Mrs./ Ms.
- CLIENT NAME: It takes the input of the name of the newly created member.
- CLIENT EMAIL: It requires email details for all sorts of communication.
- CHOOSE AGENTS: This section permits the selection of the agents who are the organization's employees who will be interacting with the leads of the organization. So, this way one can assign agents to every lead that is created. The fields are editable once the details are fed into them.
- LEAD SOURCE: This keeps track of the sources from where the maximum engagement is being created for the organization.
- LEAD CATEGORY: This permits the classification of the identified leads into categories depending on their received queries.
- LEAD VALUE: Lead value is the expected charges that can be expected from the lead if they are converted as the client for the organization.
- ADD FOLLOW-UP: This section updates on whether the next conversation or discussion with the member is to be scheduled or not.
- STATUS: This defines whether the specific lead's working status is Pending, Confirmed or Overview. The three options are changeable depending on the discussions done with the lead.
- NOTE: This records any important point that the lead has mentioned in their requirements which should be taken care of while any conversation.
- COMPANY NAME: For instance, when the client belongs to an organization or a company these details are required. So, this section records the data of the organization the work being done for.
- WEBSITE: Records the link for the official website of the organization in case a brief overview is ever needed.
- MOBILE: Individual contact details for any kind of urgent communication.
- OFFICE PHONE NUMBER: Phone numbers are collected in the database for communication purposes.
- COUNTRY: The location (country) of the organization one is working with should be known.
- STATE: It records the location (state) where the organization is based.
- CITY: It records the location (city) where the organization is based.
- POSTAL CODE: It records the detailed location by recording the postal code for the organization.
- ADDRESS: This is to collect the complete address of the company for any future reasons where it might be of some use to the recording organization.
Lead Forms
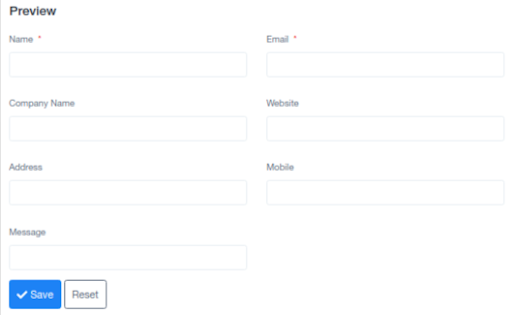
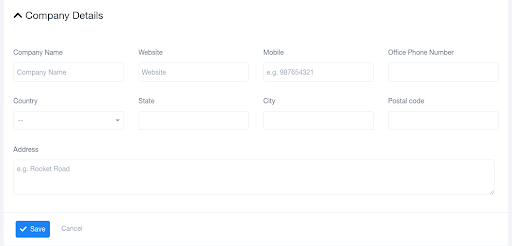
Lead Forms are the forms that are visible to the audience when they are trying to send in their queries to the organization. The forms mainly demand the following information and the given fields can be enabled and disabled as per the organization's decisions.
The Lead Form looks like this to the lead when they are submitting their details along with the message that they are willing to ask.
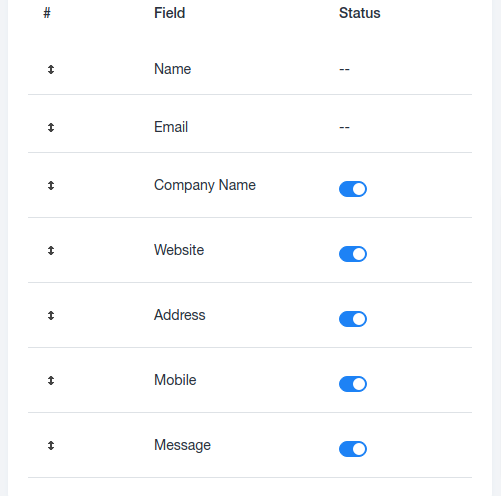
If by any chance, one feels that taking information for the given spaces/ section is unnecessary then the user can choose to disable that section so that the lead doesn't feed in data for the specific section, and further storage in the database is also reduced.